OTRS 6 Installation Guide (Community Edition)
Note: For the sake of simplicity, all Linux commands are displayed without the additional sudo, which is required for some commands if the installation is not performed as root.
Despite the comments, commands can be copied 1:1 and inserted into the command line.
Linux distribution which OTRS should be installed on:
1. Linux packages
dnf config-manager --set-enabled powertools && `# Extends the package management` \
dnf upgrade -y &&                              `# Updates installed packages` \
dnf install -y -d1 \
    epel-release                               `# Repository for additional packages` \
    httpd                                      `# Apache as web server` \
    mariadb mariadb-server                     `# MariaDB as DBMS` \
    cpanminus                                  `# Allows to install the latest Perl modules` \
    tar
subscription-manager repos --enable "codeready-builder-for-rhel-8-$(/bin/arch)-rpms" && `# Extends the package management` \
dnf upgrade -y && `# Updates installed packages` \
dnf install -y -d1 \
https://dl.fedoraproject.org/pub/epel/epel-release-latest-8.noarch.rpm `# Repository for additional packages` \
httpd `# Apache as web server` \
mariadb mariadb-server `# MariaDB as DBMS` \
cpanminus `# Allows to install the latest Perl modules` \
tar `# To extract files`apt -y -qq upgrade && `# Updates installed packages` \
apt install -y -qq \
apache2 `# Apache as web server` \
mariadb-client mariadb-server `# MariaDB as DBMS` \
cpanminus `# Allows to install the latest Perl modules`apt -y -qq upgrade && `# Updates installed packages` \
apt install -y -qq \
apache2 `# Apache as web server` \
mariadb-client mariadb-server `# MariaDB as DBMS` \
cpanminus `# Allows to install the latest Perl modules` \
curl `# To download files`\
make `# Dependency on installing packages`zypper addrepo https://download.opensuse.org/repositories/devel:languages:perl/$(hostnamectl | grep -oP 'Operating System: \K.*' | tr ' ' '_')/devel:languages:perl.repo && `# Extends the package management` \
zypper --no-gpg-checks refresh && \
zypper update -y && `# Updates installed packages` \
zypper -q -n install \
perl-Module-Install-Repository `# Repository for additional packages` \
apache2 `# Apache as web server` \
mariadb mariadb-client `# MariaDB as DBMS` \
perl-App-cpanminus `# Allows to install the latest Perl modules` \
make `# Dependency on installing packages`
2. Linux settings
Database
The database configuration /etc/my.cnf.d/mariadb-server.cnf must be adapted.
The changes are added under [mysqld]. This works automatically with the following command:
sed -i '/\[mysqld\]/a max_allowed_packet=64M\nquery_cache_size=32M\ninnodb_log_file_size=256M\ncharacter-set-server=utf8\ncollation-server=utf8_unicode_ci' /etc/my.cnf.d/mariadb-server.cnf
The database configuration /etc/mysql/mariadb.conf.d/50-server.cnf must be adapted
The changes are added under [mysqld]. This works automatically with the following command:
sed -i '/\[mysqld\]/a max_allowed_packet=64M\ninnodb_log_file_size=256M\n' /etc/mysql/mariadb.conf.d/50-server.cnf
The database configuration /etc/my.cnf must be adapted
The changes are added under [mysqld]. This works automatically with the following command:
sed -i '/\[mysqld\]/a max_allowed_packet=64M\nquery_cache_size=32M\ninnodb_log_file_size=256M\ncharacter-set-server=utf8\ncollation-server=utf8_unicode_ci' /etc/my.cnf
[mysqld]
# …
max_allowed_packet=64M
query_cache_size=32M
innodb_log_file_size=256M
character-set-server=utf8
collation-server=utf8_unicode_ci
The basic configuration for the database server is then started. Assistance can be found under the command.
systemctl restart mariadb && `# Start the database server` \
mysql_secure_installation    `# Start basic configuration`
Enter current password for root (enter for none): # Press enter without input. Set root password? # Y New password: # Enter new root password (keep it safe) Re-enter new password: # Repeat new root password Remove anonymous users? # Y Disallow root login remotely? # Y Remove test database and access to it? # Y Reload privilege tables now? # Y
Since MariaDB 10.4.3 logging in as DB user root is only possible in the shell and as superuser (additional information). For this reason the OTRS database has to be created by hand.
Note: Change the CustomPassword in the command mentioned below. The password is saved in clear text. You will be prompted to enter the root password for the database.
mysql -p -uroot -e "CREATE DATABASE otrs CHARACTER SET utf8; GRANT ALL PRIVILEGES ON otrs.* TO otrs@localhost IDENTIFIED BY 'CustomPassword' WITH GRANT OPTION; FLUSH PRIVILEGES;"
Firewall
The ports for HTTP and HTTPS must be opened so OTRS can be accessed from the browser:
firewall-cmd --zone=public --add-port=80/tcp --permanent &&  `# HTTP` \
firewall-cmd --zone=public --add-port=443/tcp --permanent && `# HTTPS` \
firewall-cmd --reload                                        `# Apply the settings`
SELinux
OTRS requires a deactivated SELinux.
Note: If SELinux has to be used, exceptions are required. Since the status is set to permisse, all rules are logged that have to be added later as exceptions.
setenforce 0 &&                                                       `# Deactivates SElinux for the current session` \
sed -i 's/SELINUX=enforcing/SELINUX=permissive/g' /etc/selinux/config `# Deactivates SElinux completely`
The current status can be showed with the sestatus command. Current mode should now show permissive.
3. OTRS installation
Download and linking
For historical reasons, the installation takes place in the /opt/ directory. In addition, a symbolic link is created to ensure the path always stays the same — even after updates.
cd /opt/ && `# Change the directory` \
curl https://download.znuny.org/releases/otrs-latest-6.0.tar.gz -P ./ | tar xvz > /dev/null 2>&1 && `# Download and extract the latest OTRS version` \
ln -fns $(ls | grep "otrs-6.0*") otrs `# link otrs-6.0.x to otrs`
For historical reasons, the installation takes place in the /opt/ directory.
cd /opt/ && `# Change the directory` \
curl https://download.znuny.org/releases/otrs-latest-6.0.tar.gz -P ./ | tar xvz > /dev/null 2>&1 && `# Download and extract the latest OTRS version` \
mv $(ls | grep "otrs-6.0*") otrs `# link otrs-6.0.x to otrs`
Installation of Perl modules
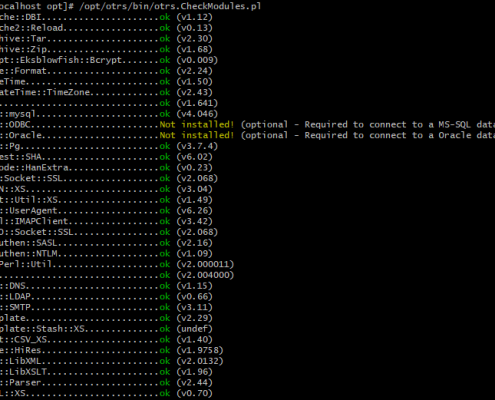
OTRS needs some additional Perl modules. This command shows all modules that are installed or needs to be installed:
/opt/otrs/bin/otrs.CheckModules.pl
You can either install each module by hand or run the following command which will automatically install all dependencies.
Note: It is strongly recommended to install optional modules in order to avoid future error messages and to obtain the best possible performance (with the exception of the Oracle, PostgreSQL and MSSQL connectors which are not required).
dnf install -y --skip-broken -d1 `/opt/otrs/bin/otrs.CheckModules.pl | grep -oP '(?<=").*(?=")'`
Not all modules were installed in the required version. cpanminus helps to catch up on that.
cpanm -n -q DateTime::TimeZone Mail::IMAPClient
apt install -y -qq `/opt/otrs/bin/otrs.CheckModules.pl | grep -oP "(?<=-y ).*(?='\.)"`
apt install -y -qq `/opt/otrs/bin/otrs.CheckModules.pl | grep -oP "(?<=-y ).*(?='\.)"`
Not all modules were installed in the required version. cpanminus helps to catch up on that.
cpanm -n -q IO::Socket::SSL
zypper -q -n -i install `/opt/otrs/bin/otrs.CheckModules.pl | grep -oP "(?<='cpan ).*(?=')" | sed 's/.*/perl(&)/'`
Not all modules were installed in the required version. cpanminus helps to catch up on that.
cpanm -n -q IO::Socket::SSL Net::SMTP Crypt::Random::Source
The output of the CheckModules script should now appear completely in green:
4. OTRS settings
Create Linux user
useradd -M -d /opt/otrs -G $(apachectl -S | grep -oP 'Group: name="\K[^"]+') -c 'OTRS user' otrs `# Create user in the Apache group`
Copy files and Apache settings
cp /opt/otrs/Kernel/Config.pm.dist /opt/otrs/Kernel/Config.pm &&                      `# File for general OTRS settings` \
mv /opt/otrs/var/cron/aaa_base.dist /opt/otrs/var/cron/aaa_base &&                    `# Crontab file` \
mv /opt/otrs/var/cron/otrs_daemon.dist /opt/otrs/var/cron/otrs_daemon &&              `# Crontab file` \
ln -s /opt/otrs/scripts/apache2-httpd.include.conf /etc/httpd/conf.d/zzz_otrs.conf && `# Links the Apache setting to the correct directory` \
sed -i '/^LoadModule mpm_event_module modules\/mod_mpm_event.so/s/^/#/' /etc/httpd/conf.modules.d/00-mpm.conf &&      `# Disable Apache MPM event` \
sed -i '/^#LoadModule mpm_prefork_module modules\/mod_mpm_prefork.so/s/^#//' /etc/httpd/conf.modules.d/00-mpm.conf && `# Activate Apache MPM prefork` \
systemctl restart httpd  &&                                                           `# Restart the web server` \
systemctl enable httpd mariadb crond                                                  `# Enable autostart of all relevant services`
cp /opt/otrs/Kernel/Config.pm.dist /opt/otrs/Kernel/Config.pm &&                                                  `# File for general OTRS settings` \
mv /opt/otrs/var/cron/aaa_base.dist /opt/otrs/var/cron/aaa_base &&                                                `# Crontab file` \
mv /opt/otrs/var/cron/otrs_daemon.dist /opt/otrs/var/cron/otrs_daemon &&                                          `# Crontab file` \
ln -s /opt/otrs/scripts/apache2-httpd.include.conf /etc/apache2/sites-available/zzz_otrs.conf &&                  `# Links the Apache setting to the correct directory` \
a2ensite zzz_otrs && a2dismod mpm_event && a2enmod mpm_prefork && a2enmod headers && systemctl restart apache2 && `# Enable required modules` \
systemctl enable apache2 mariadb cron                                                                             `# Enable autostart of all relevant services`
cp /opt/otrs/Kernel/Config.pm.dist /opt/otrs/Kernel/Config.pm &&                        `# File for general OTRS settings` \
mv /opt/otrs/var/cron/aaa_base.dist /opt/otrs/var/cron/aaa_base &&                      `# Crontab file` \
mv /opt/otrs/var/cron/otrs_daemon.dist /opt/otrs/var/cron/otrs_daemon &&                `# Crontab file` \
ln -s /opt/otrs/scripts/apache2-httpd.include.conf /etc/apache2/conf.d/zzz_otrs.conf && `# Links the Apache setting to the correct directory` \
a2enmod access_compat && a2enmod headers && a2enmod perl && a2enmod deflate && a2enmod filter && systemctl restart apache2 && `# Enable required modules` \
systemctl enable apache2 mariadb cron                                                   `# Enable autostart of all relevant services`
Permissions and daemon
/opt/otrs/bin/otrs.SetPermissions.pl &&                                           `# Sets the Linux permissions` \
su -c "/opt/otrs/bin/otrs.Daemon.pl start > /dev/null 2>&1" -s /bin/bash otrs &&  `# Starts the OTRS daemon` \
su -c "/opt/otrs/bin/Cron.sh start" -s /bin/bash otrs                             `# Creates crontabs in Linux`
/opt/otrs/bin/otrs.SetPermissions.pl --web-group=www &&                           `# Sets the Linux permissions` \
su -c "/opt/otrs/bin/otrs.Daemon.pl start > /dev/null 2>&1" -s /bin/bash otrs &&  `# Starts the OTRS daemon` \
su -c "/opt/otrs/bin/Cron.sh start" -s /bin/bash otrs                             `# Creates crontabs in Linux`
5. OTRS in the web interface
The rest of the installation is carried out in the web interface. Call up your domain with the addition /otrs/installer.pl.
For example, http://localhost/otrs/installer.pl, https://support.efflux.de/otrs/installer.pl or https://1.1.1.1/otrs/installer.pl.
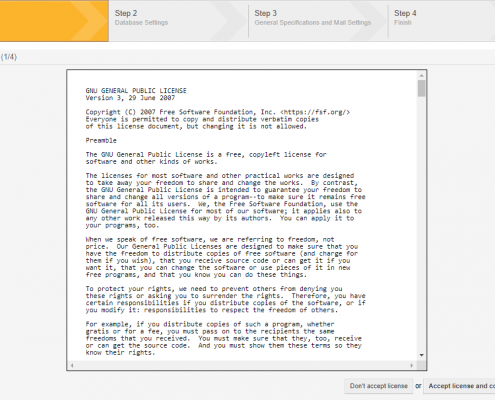
Assistance can be found under the pictures.
Start the installation
Step 1: Accept the license
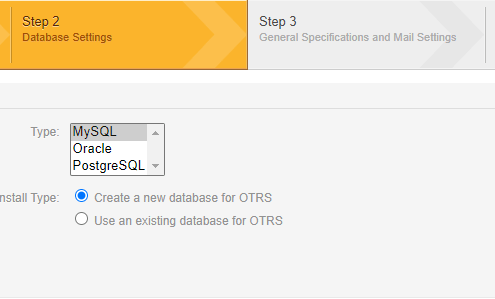
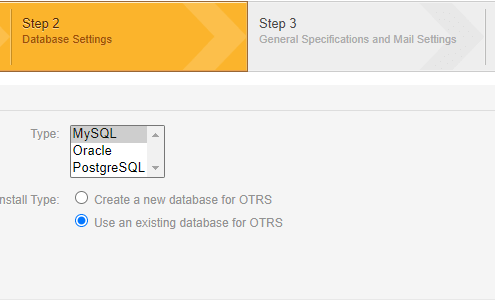
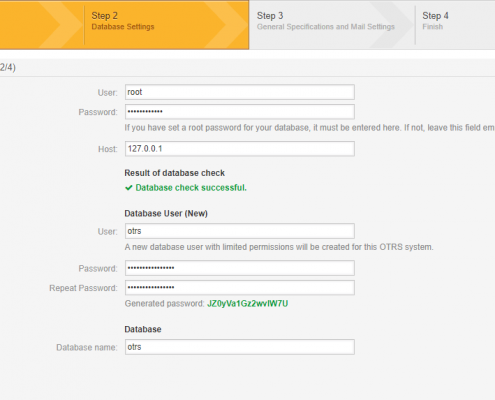
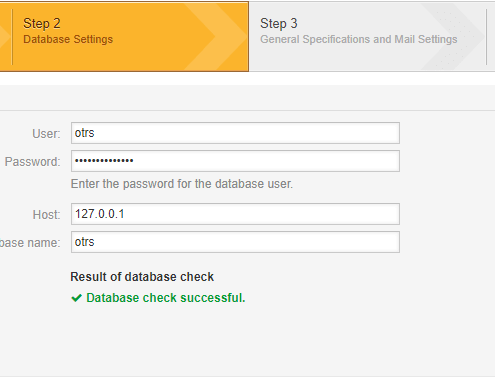
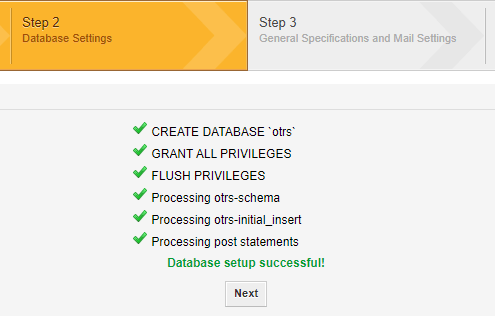
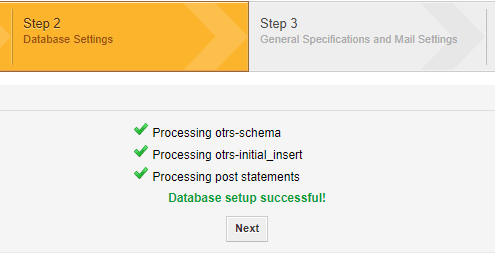
Step 2: Database Settings
Type MySQL (also applies to MariaDB) Installation type Create a new database for OTRS
Type MySQL (also applies to MariaDB) Installation type Use an existing database for OTRS
User DB user who can create databases (root by default) Password Password of the DB user Host 127.0.0.1, localhost or address of a remote server User Name of the new DB user Password Password of the new DB user; the generated password can be changed (stored as plain text) Database Name of the new database
User otrs Password Password of the DB user Host 127.0.0.1, localhost or address of a remote server Database name otrs
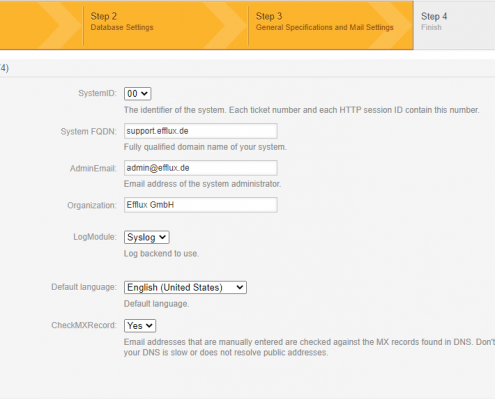
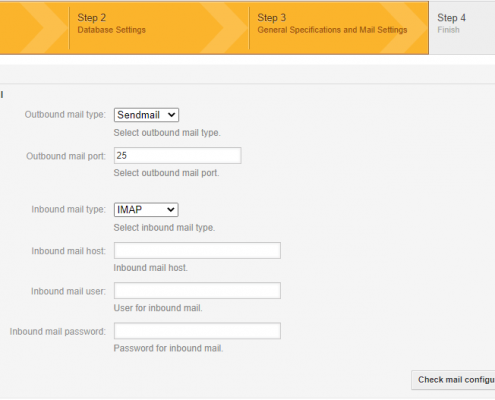
Step 3: General Specifications and Mail Settings
SystemID Unique ID of the system; important when multiple OTRS systems communicate with each other System FQDN FQDN under which the page should be accessed Organization Your organization LogModule When writing to a file: make sure the OTRS user has write permissions (e.g. if outside of /opt/otrs/var/) Default Language Of the users CheckMXRecord See displayed information
These settings can be changed in the admin area.
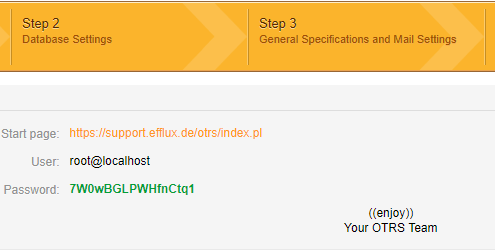
Step 4: Finish
The installation is complete. Save the password for the root@localhost user.
Restart
A restart ensures that all services start correctly.
reboot
6. User settings in OTRS
In future, you will use the ending /otrs/index.pl to log in (we will show you how to change this in another blog entry).
After you have logged in with root@localhost, you should change the generated password. You can do this by clicking on the user icon in the top left corner, Personal preferences and then User Profile.
You should no longer work with this user in the future. Write down the password carefully and create your own agent with full RW (Read and Write) permissions in the admin area and log in with your new account.
Congratulations, your OTRS system has been successfully installed and is ready for use.
Please feel free to leave a comment if you have any questions or suggestions.
You can also contact us if you need professional support, development or anything else OTRS related.
Hello could you please explain to me what this piece of code does because I cant get it to work
useradd -M -d /opt/otrs -G $(apachectl -S | grep -oP ‘Group: name=”K[^”]+’) -c ‘OTRS user’ otrs
Hello David,
after the last update, we had some problems with removed backslashes in our English blog.
Thanks for noticing. The command got fixed and should work again.
It’s basically just checking what the group name of the webserver is; depending on the distribution, it can be www-data, apache, or something else.
Your Efflux team